

Netfilter/Iptables Layer7 應(yīng)用層過濾策略
責(zé)編:admin |2014-12-30 14:52:02Netfilter/Iptables 作為一個(gè)典型的包過濾防火墻體系,對(duì)于網(wǎng)絡(luò)層,傳輸層的數(shù)據(jù)包過濾具有非常優(yōu)秀的性能和效率,然而,對(duì)于一些面向局域網(wǎng)上網(wǎng)用戶的Linux網(wǎng)關(guān)服務(wù)器,有時(shí)候還需要使用QQ,MSN等聊天,使用BT下載工具等現(xiàn)象進(jìn)行封鎖。下面將介紹如何為Netfilter/Iptables 增加應(yīng)用層過濾。
QQ,MSN等聊天,使用BT下載工具均使用了相對(duì)固定的應(yīng)用層協(xié)議。使用L7-filter項(xiàng)目的補(bǔ)丁文件包可以為linux內(nèi)核增加相應(yīng)的應(yīng)用層過濾功能,結(jié)合其提供的l7-protocols第7層協(xié)議定義包,能夠識(shí)別不同應(yīng)用層的數(shù)據(jù)特征
L7-filter項(xiàng)目站點(diǎn):http://l7-filter.sourceforge.net/ 下載最新的補(bǔ)丁包及協(xié)議包
內(nèi)核站點(diǎn):http://www.kernel.org 下載內(nèi)核,iptables的源碼包
注意:L7-filter補(bǔ)丁包內(nèi)的數(shù)據(jù),要與內(nèi)核及iptables源碼版本相匹配
將netfilter-layer7 源碼包中的對(duì)應(yīng)補(bǔ)丁文件添加到內(nèi)核源碼中,對(duì)內(nèi)核進(jìn)行重新編譯,安裝,安裝后使用新內(nèi)核啟動(dòng)Linux操作系統(tǒng)。
注意:源碼目錄所在分區(qū)至少保持有2.5G的剩余磁盤空間。
1 wget http://jaist.dl.sourceforge.net/project/l7-filter/l7-filter%20kernel%20version/2.22/netfilter-layer7-v2.22.tar.gz
2 wget https://www.kernel.org/pub/linux/kernel/v2.6/linux-2.6.28.8.tar.xz
3 wget http://www.netfilter.org/projects/iptables/files/iptables-1.4.2.tar.bz2
4 wget http://jaist.dl.sourceforge.net/project/l7-filter/Protocol%20definitions/2009-05-28/l7-protocols-2009-05-28.tar.gz
幫助文件:http://l7-filter.sf.net/HOWTO-kernel
netfilter-layer7:netfilter-layer7-v2.22.tar.gz
Linux內(nèi)核源碼包:linux-2.6.28.8.tar.xz
l7-protocols協(xié)議包:l7-protocols-2009-05-28.tar.gz
iptables源碼包:iptables-1.4.2.tar.bz2
內(nèi)核編譯步驟:
解包
配置make menuconfig
編譯
安裝
1.解壓釋放netfilter-layer7 和內(nèi)核源碼包,使用patch工具合并補(bǔ)丁文件
1 yum -y install xz
2 xz -d linux-2.6.28.8.tar.xz
3 tar xf linux-2.6.28.8.tar -C /usr/src/
4 tar xf netfilter-layer7-v2.22.tar.gz -C /usr/src/
5 cd /usr/src/linux-2.6.28.8/
6 patch -p1 < ../netfilter-layer7-v2.22/kernel-2.6.25-2.6.28-layer7-2.22.patch
——————————————————————————
7 patching file net/netfilter/Kconfig
8 Hunk #1 succeeded at 757 with fuzz 1 (offset -38 lines).
9 patching file net/netfilter/Makefile
10 Hunk #1 succeeded at 78 with fuzz 2 (offset -6 lines).
11 patching file net/netfilter/xt_layer7.c
12 patching file net/netfilter/regexp/regexp.c
13 patching file net/netfilter/regexp/regexp.h
14 patching file net/netfilter/regexp/regmagic.h
15 patching file net/netfilter/regexp/regsub.c
16 patching file net/netfilter/nf_conntrack_core.c
17 Hunk #1 succeeded at 206 (offset 5 lines).
18 patching file net/netfilter/nf_conntrack_standalone.c
19 Hunk #1 succeeded at 162 (offset -3 lines).
20 patching file include/net/netfilter/nf_conntrack.h
21 patching file include/linux/netfilter/xt_layer7.h
2.重新配置內(nèi)核編譯參數(shù),添加state機(jī)制及l(fā)ayer7支持
使用當(dāng)前RHEL5系統(tǒng)的內(nèi)核配置文件作為參考,在此基礎(chǔ)上添加新的功能
1 cp /boot/config-2.6.18-194.el5 .config
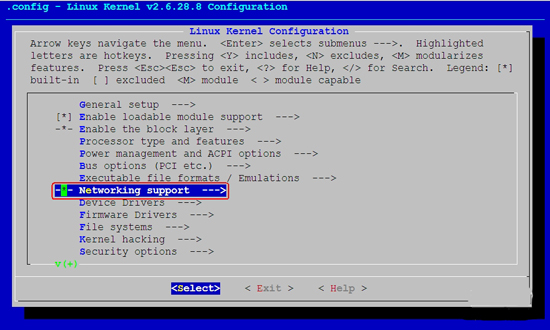
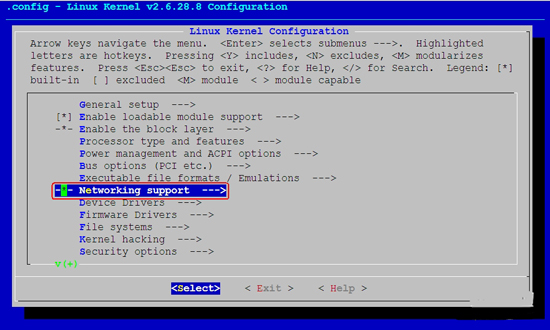
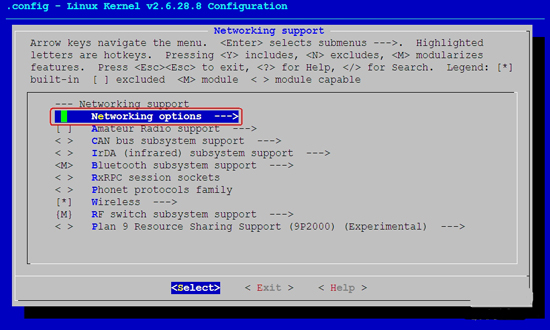
2 make menuconfig
在配置界面中,方向鍵用于定位需要配置的項(xiàng)目
select進(jìn)入子配置菜單
exit返回上一層
help查看幫助信息
空格切換所選項(xiàng)目的編譯類型
三種狀態(tài):
[]表示不需要該功能
[M]將功能編譯成模塊
[*]將功能直接編入內(nèi)核
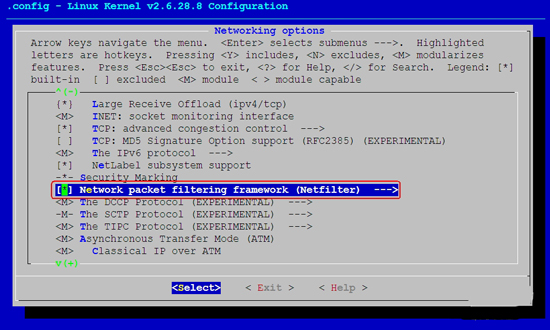
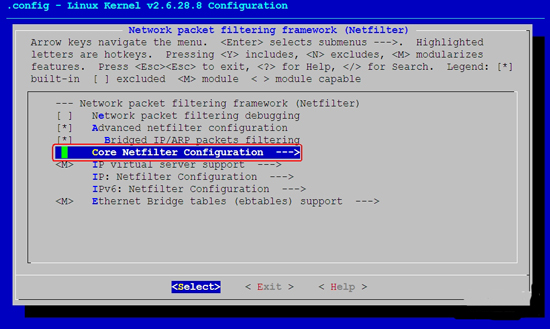
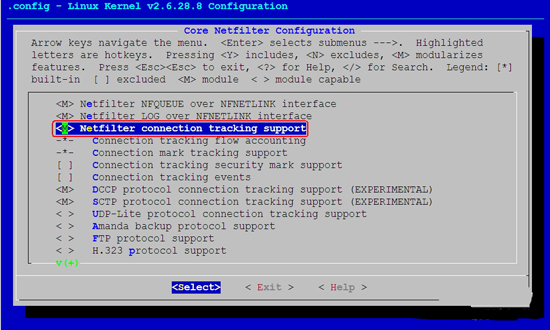
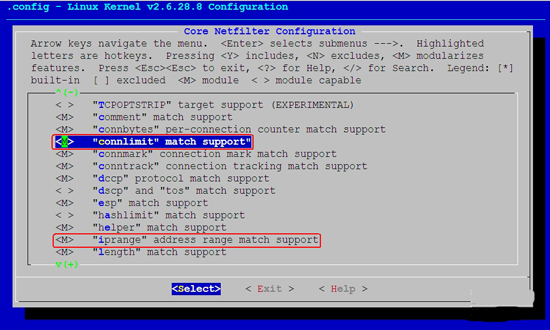
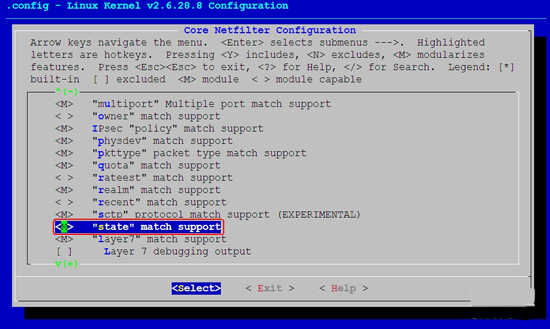
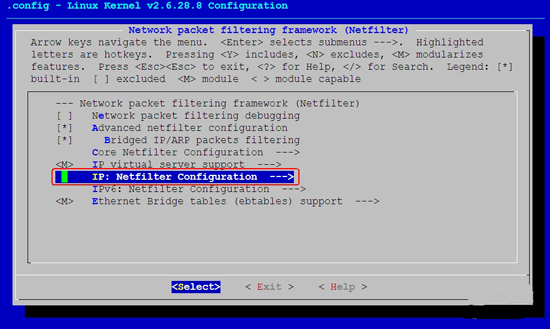
Networking support —> Networking options —> Network packet filtering framework (Netfilter) —> Core Netfilter Configuration —>
<M> Netfilter connection tracking support
<M> "layer7" match support
<M> "string" match support
<M> "time" match support
<M> "iprange" address range match support
<M> "connlimit" match support"
<M> "state" match support
<M> "conntrack" connection match support
<M> "mac" address match support
<M> "multiport" Multiple port match support
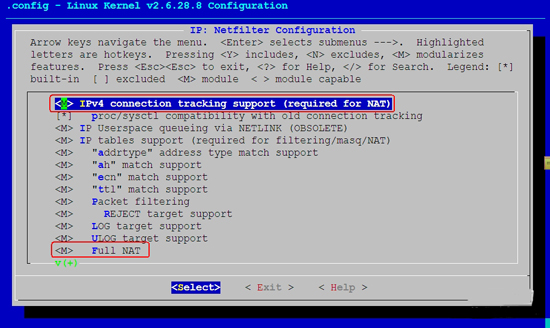
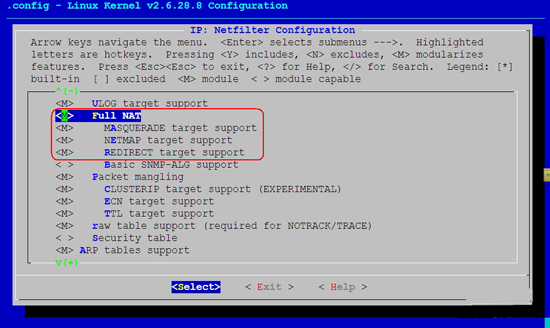
Networking support —> Networking options —> Network packet filtering framework (Netfilter) —> IP: Netfilter Configuration —>
<M> IPv4 connection tracking support (required for NAT)
<M> Full NAT
<M> MASQUERADE target support
<M> NETMAP target support
<M> REDIRECT target support


使用Exit返回 最后當(dāng)提示保存時(shí),使用Yes確認(rèn)保存,修改將保存到源碼目錄中的.config文件中。
/usr/src/linux-2.6.28.8/.config
3.編譯新內(nèi)核,并安裝新內(nèi)核文件
1 make && make modules_install && make install
新內(nèi)核編譯安裝過程將花費(fèi)較長(zhǎng)時(shí)間,數(shù)十分鐘到數(shù)小時(shí)不等
新內(nèi)核文件被安裝到/boot目錄,模塊文件將復(fù)制到/lib/modules/2.6.28
1 [root@www iptables-1.4.2]# ls -l /boot/*2.6.28*
2 -rw——- 1 root root 2604581 12-08 10:16 /boot/initrd-2.6.28.8.img
3 -rw-r–r– 1 root root 1129804 12-08 10:15 /boot/System.map-2.6.28.8
4 -rw-r–r– 1 root root 2102800 12-08 10:15 /boot/vmlinuz-2.6.28.8
5 [root@www iptables-1.4.2]# du -sh /lib/modules/2.6.28.8/
6 318M/lib/modules/2.6.28.8/
如果編譯內(nèi)核,途中斷過,想重新編譯,那么先使用
make mrproper 刪除不必要的文件和目錄,初次編譯內(nèi)核不需要
make clean 刪除不必要的模塊和文件
4.調(diào)整GRUB引導(dǎo)菜單,使系統(tǒng)以新內(nèi)核啟動(dòng),然后重啟linux服務(wù)器
1 vi /boot/grub/grub.conf
2 default=0
3 timeout=5
4 splashimage=(hd0,0)/grub/splash.xpm.gz
5 hiddenmenu
6 title Red Hat Enterprise Linux Server (2.6.28.8)
7 root (hd0,0)
8 kernel /vmlinuz-2.6.28.8 ro root=LABEL=/ rhgb quiet
9 initrd /initrd-2.6.28.8.img
10 title Red Hat Enterprise Linux Server (2.6.18-194.el5)
11 root (hd0,0)
12 kernel /vmlinuz-2.6.18-194.el5 ro root=LABEL=/ rhgb quiet
13 initrd /initrd-2.6.18-194.el5.img
14 reboot
重新編譯安裝iptables及安裝l7-protocols協(xié)議包
除了要對(duì)linux內(nèi)核應(yīng)用layer7補(bǔ)丁以外,對(duì)iptables同樣需要應(yīng)用layer7補(bǔ)丁,才能完整實(shí)現(xiàn)應(yīng)用層過濾功能,在解包后的/usr/src/netfilter-layer7-v2.22/目錄中也包括針對(duì)iptables源碼包的補(bǔ)丁文件。l7-protocols協(xié)議包用于為iptables提供判斷別應(yīng)用層數(shù)據(jù)的特征依據(jù)。
1.卸載原有系統(tǒng)中的iptables
1 cp /etc/rc.d/init.d/iptables /tmp/ 備份iptables啟動(dòng)腳本
2 cp /etc/sysconfig/iptables.config /tmp 備份iptables配置文件
3 rpm -e iptables-ipv6 iptables iptstate –nodeps
2.解壓釋放iptables,并應(yīng)用補(bǔ)丁文件(復(fù)制extensions子目錄即可)
1 tar xf iptables-1.4.2.tar.bz2 -C /usr/src/
2 cd /usr/src/iptables-1.4.2/
3 cp /usr/src/netfilter-layer7-v2.22/iptables-1.4.3forward-for-kernel-2.6.20forward/libxt_layer7.* extensions/
3.配置,編譯并安裝iptables,需要使用–with-ksource 參數(shù)指定內(nèi)核源碼路徑
1 ./configure –prefix=/ –with-ksource=/usr/src/linux-2.6.28.8
2 make && make install
4.安裝l7-protocols協(xié)議包
1 tar xf l7-protocols-2009-05-28.tar.gz
2 cd l7-protocols-2009-05-28
3 make install
5.恢復(fù)iptables啟動(dòng)腳本及配置文件
1 cp /tmp/iptables /etc/init.d/iptables
2 cp /tmp/iptables.config /etc/sysconfig/iptables.config
3 vim /etc/rc.d/init.d/iptables 編輯iptables啟動(dòng)腳本
把$iptables的路徑改成/sbin/$iptables
1 service iptables start
2 chkconfig iptables on
如果在防火墻啟動(dòng)的時(shí)候報(bào)錯(cuò)
Loading additional iptables modules: ip_conntrack_netbios_n[FAILED]
vi /etc/sysconfig/iptables-config
注釋掉
#IPTABLES_MODULES="ip_conntrack_netbios_ns"
使用iptables 設(shè)置應(yīng)用層過濾規(guī)則
使用layer7顯示匹配策略過濾使用QQ,MSN Edonkey等應(yīng)用層協(xié)議的數(shù)據(jù)訪問
1 iptables -A FORWARD -m layer7 –l7proto qq -j DROP
2 iptables -A FORWARD -m layer7 –l7proto msn-filetransfer -j DROP
3 iptables -A FORWARD -m layer7 –l7proto msnmessenger -j DROP
4 iptables -A FORWARD -m layer7 –l7proto bittorrenr -j DROP
5 iptables -A FORWARD -m layer7 –l7proto xunlei -j DROP
6 iptables -A FORWARD -m layer7 –l7proto edonkey -j DROP
使用–connlimit 顯示匹配進(jìn)行數(shù)據(jù)并發(fā)連接控制,超過100個(gè)并發(fā)連接將拒絕
1 iptables -A FORWARD -p tcp –syn -m connlimit –connlimit-above 100 -j DROP
使用–time顯示匹配根據(jù)時(shí)間范圍設(shè)置訪問策略,允許周一到周五 8:00-18:00之間的數(shù)據(jù)訪問
1 iptables -A FORWARD -p tcp –dport 80 -m time –timestart 8:00 –timestop 18:00 –weekdays Mon,Tue,Wed,Thu,F(xiàn)ri -j ACCEPT
星期一 MON
星期二 TUE
星期三 WED
星期四 THU
星期五 FRI
星期六 SAT
星期天 SUN
使用string顯示匹配策略過濾包含tencent,verycd,***,***的網(wǎng)絡(luò)訪問
1 iptables -A FORWARD -p udp –dport 53 -m string –string "qq" –algo bm -j DROP
2 iptables -A FORWARD -p udp –dport 53 -m string –string "tencent" –algo bm -j DROP
3 iptables -A FORWARD -p udp –dport 53 -m string –string "verycd" –algo bm -j DROP
4 iptables -A FORWARD -p udp –dport 53 -m string –string "***" –algo bm -j DROP
5 iptables -A FORWARD -p udp –dport 53 -m string –string "***" –algo bm -j DROP
其中–algo參數(shù)用于指定字符串識(shí)別算法,bm 或 kmp
備注1:
XZ壓縮最新壓縮率之王
xz是絕大數(shù)linux默認(rèn)就帶的一個(gè)壓縮工具。壓縮的比例大,但是時(shí)間慢
xz -z 要壓縮的文件
如果要保留被壓縮的文件加上參數(shù) -k ,如果要設(shè)置壓縮率加入?yún)?shù) -0 到 -9調(diào)節(jié)壓縮率。如果不設(shè)置,默認(rèn)壓縮等級(jí)是6.
xz -d 要解壓的文件
同樣使用 -k 參數(shù)來保留被解壓縮的文件。
創(chuàng)建或解壓tar.xz文件的方法
習(xí)慣了tar czvf或tar xzvf的人可能碰到tar.xz也會(huì)想用單一命令搞定解壓或壓縮。其實(shí)不行
tar里面沒有征對(duì)xz格式的參數(shù)比如:
z是針對(duì)gzip
j是針對(duì) bzip2
創(chuàng)建tar.xz文件:只要先tar cvf Crushlinux.tar Crushlinux/這樣創(chuàng)建Crushlinux.tar文件先,然后使用xz -z Crushlinux.tar來將Crushlinux.tar壓縮成為Crushlinux.tar.xz
解壓tar.xz文件:先xz -d Crushlinux.tar.xz將Crushlinux.tar.xz解壓成Crushlinux.tar 然后,再用tar xvf Crushlinux.tar來解包
文章來源:http://crushlinux.blog.51cto.com/2663646/1588574
- 周鴻祎領(lǐng)銜!百所高校+企業(yè)組團(tuán)亮相ISC.AI 2025“紅衣課堂”
- 港科大發(fā)布大模型越獄攻擊評(píng)估基準(zhǔn),覆蓋6大類別37種方法
- 引領(lǐng)智能運(yùn)維!全新FortiAIOps 3.0重新定義IT運(yùn)營(yíng)
- MirageFlow:一種針對(duì)Tor的新型帶寬膨脹攻擊
- 英偉達(dá)約談事件的制度邏輯與趨勢(shì)展望
- 國(guó)家互聯(lián)網(wǎng)信息辦公室發(fā)布《國(guó)家信息化發(fā)展報(bào)告(2024年)》
- 火狐中國(guó)終止運(yùn)營(yíng):辦公地?zé)o人,用戶賬號(hào)數(shù)據(jù)面臨清空
- 25年一直未變!網(wǎng)絡(luò)安全永恒的“十大法則”
- 關(guān)于征集數(shù)據(jù)安全評(píng)估標(biāo)準(zhǔn)化應(yīng)用實(shí)踐案例的通知
- ISC.AI 2025主題前瞻:ALL IN AGENT,全面擁抱智能體時(shí)代!